

"When a man's stomach is full
it makes no difference whether he is rich or poor."
Euripides (BC 480 - 406 Greek Tragic Poet)
Grizzlys BBQ
Most
traditionalists
prefer
the
"Low
and
Slow"
method
of
smoking
a
Brisket.
However
there
are
others
who
find
the
"Hot
and
Fast"
method
to
be
very
appealing.
The
only
difference
between
“Hot
&
Fast”
and
“Low
&
Slow”
is
pit
temperature
and
the
length
of
the
cook.
In
the
H&F
cook,
you
will
definitely
need
to
use
a
water
pan,
although
you
will
be
refilling
it
constantly
since
you
will be cooking at about 300°F and water boils at 212°F.
Being
the
traditionalist
that
I
am,
I
much
prefer
Low
&
Slow.
So
here
is
how
to do a nice Low and Slow Brisket.
What You’ll Need
Beef Brisket
Disposable Roasting Pan
Heavy Duty Aluminum Foil
Seasoning Rub
Grill or Smoker
Charcoal ** (preferably Lump)
Smoking Wood - Pecan, Hickory etc
How It’s Done
Preheat
your
smoker
to
225°F
with
INDIRECT
heating.
If
your
using
a
water
pan
fill
it
with
water.
If
possible
place
a
drip
pan
directly below where the meat will go to catch all the drippings. This makes cleanup much easier.
If
your
smoking
an
untrimmed
Packer
trim
off
as
much
of
the
fat
on
top
as
you
can
along
with
any
“silver
skin”
there
may
be.
Then
trim
the
bottom
"Fat
Cap"
leaving
no
more
then
¼"
to
½”
of
fat
(the
fat
is
what
helps
keep
the
meat
moist
and
adds
flavor
during
cooking).
If
on
the
other
hand
you
are
smoking
a
“Flat”
there
will
probably
be
very
little
trimming
needed.
You
should
also keep in mind that the cooking times for a “Flat” will be less then a whole packer since the Flat is not as thick as the point.
Liberally rub the entire brisket with your choice of rub and place on your cooking grate.
When
the
internal
temperature
of
the
meat
reaches
165°F
place
the
meat
in
a
disposable
aluminum
pan
and
cover
tightly
with
aluminum foil. If you don’t have room for a pan then wrap the meat in heavy duty aluminum foil and place it back on the grate.
At
this
point
you
can
continue
cooking
on
your
smoker
or
place
the
pan
in
an
oven
set
at
240°.
By
doing
this
you
accomplish
two
things.
First,
you
are
able
to
collect
the
juices
of
the
meat
which
you
will
defat
later
and
use
when
you
cut
the
meat.
Second,
you
will avoid drying out the thinner “Flat” section while allowing the point to come to temp.
When
the
internal
temperature
reaches
200°,
insert
a
probe
into
the
meat.
If
the
meat
is
ready,
it
will
slide
in
as
if
going
into
hot
butter. If it does not, continue cooking and recheck every 10 minutes until it does.
Once
the
meat
is
done,
drain
off
and
reserve
the
juices,
wrap
the
meat
back
up
in
foil
and
place
it
in
an
oven
which
has
been
warmed
and
turned
OFF.
If
no
oven
is
available
simply
cover
the
foiled
meat
with
a
towel
and
place
in
an
insulated
chest
(an
empty ice chest works fine). Allow to rest for at least 1 hour.
Strain
the
juices
into
a
bowl
or
other
container
and
refrigerate.
After
a
while
the
fat
rises
to
the
surface
and
solidifies.
Once
this
happens
simply
pop
the
fat
layer
off
with
a
spoon
and
discard.
Heat
the
remaining
juices,
which
are
now
in
gelatin
form,
for
a
few
seconds.
This
can
then
be
poured
over
the
meat
once
it
has
been
sliced
adding
back
moisture
and
delicious
natural
beef
flavoring.
The average cook time (whole average sized packer) will be approximately 10 hours... with a rest time of at least 1 hour.
From start to finish.....about 11 hours.
Tips
Indirect
heating
-
is
very
important
for
a
brisket.
Most
smokers
are
equipped
for
just
that.
If
you
are
having
to
use
a
charcoal
grill,
simply
pile
all
your
coals
on
one
side
(Hot
zone)
and
place
the
meat
on
the
other
side
(Cool
Zone).
If
you
have
to
use
a
gas
grill
you
will
probably
only
have
room
for
a
Point
or
Flat.
Turn
on
the
burners
on
one
side
(Hot
Zone)
and
place
the
meat
on
the
other
side (Cool Zone).
TEMPERATURE
-
is
very
important.
NEVER
trust
the
thermometer
which
came
with
your
cooker
unless
you
have
checked
it
for
accuracy. Otherwise use an alternate temperature probe to check the cooking chamber temperature.
AuJu
-
These
are
the
wonderful
juices
you
save
from
the
meat
while
cooking.
Once
de-fatted
these
juices
help
keep
the
sliced
meat
from drying out quickly and add back some of that beautiful beef flavor.
Timing
-
It’s
almost
impossible
to
predict
an
exact
time
when
the
meat
is
ready.
Although
you
can
get
in
the
Ball
Park
allow
yourself plenty of time.
Practice,
Practice,
Practice
-
Getting
the
perfect
brisket
is
difficult.
It
takes
time,
patience
and
practice.
Don’t
give
up.
Ask
questions from those that know…and when you do expect a dozen different answers, none of which may be wrong.
Cook
Now
-
Eat
Later
-
Have
time
to
cook
on
the
weekend,
but
the
gathering
is
mid-week.
No
problem.
I
use
this
trick
all
the
time.
Cook
your
meat,
allow
to
rest
for
about
an
hour,
then
slice
up
as
you
normally
would.
Keeping
the
slices
together,
place
them
into
a
ziploc
baggie
along
with
a
little
AuJu,
remove
as
much
air
as
possible
and
seal.
Although
ziploc
baggies
will
work,
a
vacuum
sealer
is
much
better
since
it
removes
all
the
air
and
forces
some
of
the
AuJu
back
into
the
meat.
To
reheat:
if
it
is
vacuum
sealed
in
a
good
vacuum
bag
i
usually
place
it
directly
on
center
rack
of
185℉
oven
till
it
is
heated
through.
If
it
is
in
a
standard
ziplock bag, transfer the meat into a pan, add additional AuJu if you have it, then cover with foil and heat in a 200℉ oven.
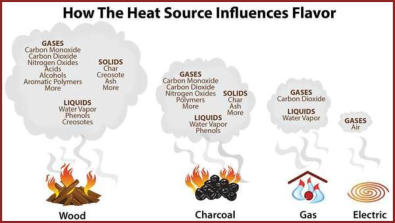
Fuel
-
The
type
of
fuel
you
use
often
depends
on
the
type
of
cooker
you
have.
If
you
have
an
offset
stick
burner
you
will
use
logs
and
possibly
some
charcoal.
If
you
have
a
Weber
Smokey
Mountain
(WSM)…
charcoal
with
wood
chunks.
I
have
a
vertical
insulated
rig
and
use
primarily
charcoal
(Kingsford
blue
bag)
and
wood
chunks.
Use
a
gas
cheater
or
a
chimney
to
start
your
charcoal.
NEVER…I
repeat
NEVER
use
lighter
fluid.
Also…don’t
soak
your
wood
(chips,
chunks...or
logs)
it
does
no
good.
The
water
usually
doesn’t penetrate the wood and if it does it is only a fraction of an inch (1/64” )


Smoked Brisket
Grizzlys BBQ


"When a man's stomach is full
it makes no difference whether he is rich or poor."
Euripides (BC 480 - 406 Greek Tragic Poet)

Grizzlys BBQ
Most
traditionalists
prefer
the
"Low
and
Slow"
method
of
smoking
a
Brisket.
However
there
are
others
who
find
the
"Hot
and
Fast"
method
to
be
very appealing.
The
only
difference
between
“Hot
&
Fast”
and
“Low
&
Slow”
is
pit
temperature
and
the
length
of
the
cook.
In
the
H&F
cook,
you
will
definitely
need
to
use
a
water
pan,
although
you
will
be
refilling
it
constantly
since
you
will
be
cooking
at
about
300°
and water boils at 212°F.
Being
the
traditionalist
that
I
am,
I
much
prefer
Low
&
Slow.
So
here
is
how
to
do
a
nice
Low
and
Slow
Brisket.
What You’ll Need
Beef Brisket
Disposable Roasting Pan
Heavy Duty Aluminum Foil
Seasoning Rub
Grill or Smoker
Charcoal ** (preferably Lump)
Smoking Wood - Pecan, Hickory etc
How It’s Done
Preheat
your
smoker
to
225°F
with
INDIRECT
heating.
If
your
using
a
water
pan
fill
it
with
water.
If
possible
place
a
drip
pan
directly
below
where
the
meat
will
go
to
catch
all
the drippings. This makes cleanup much easier.
If
your
smoking
an
untrimmed
Packer
trim
off
as
much
of
the
fat
on
top
as
you
can
along
with
any
“silver
skin”
there
may
be.
Then
trim
the
bottom
"Fat
Cap"
leaving
no
more
then
¼"
to
½”
of
fat
(the
fat
is
what
helps
keep
the
meat
moist
and
adds
flavor
during
cooking).
If
on
the
other
hand
you
are
smoking
a
“Flat”
there
will
probably
be
very
little
trimming
needed.
You
should
also
keep
in
mind
that
the
cooking
times
for
a
“Flat”
will
be
less
then
a
whole
packer
since
the
Flat
is
not
as
thick
as
the
point.
Liberally
rub
the
entire
brisket
with
your
choice
of
rub and place on your cooking grate.
When
the
internal
temperature
of
the
meat
reaches
165°
place
the
meat
in
a
disposable
aluminum
pan
and
cover
tightly
with
aluminum
foil.
If
you
don’t
have
room
for
a
pan
then
wrap
the
meat
in
heavy
duty aluminum foil and place it back on the grate.
At
this
point
you
can
continue
cooking
on
your
smoker
or
place
the
pan
in
an
oven
set
at
240°F.
By
doing
this
you
accomplish
two
things.
First,
you
are
able
to
collect
the
juices
of
the
meat
which
you
will
de-fat
later
and
use
when
you
cut
the
meat.
Second,
you
will
avoid
drying
out
the
thinner
“Flat”
section
while allowing the point to come to temp.
When
the
internal
temperature
reaches
200°F,
insert
a
probe
into
the
meat.
If
the
meat
is
ready,
it
will
slide
in
as
if
going
into
hot
butter.
If
it
does
not,
continue
cooking and recheck every 10 minutes until it does.
Once
the
meat
is
done,
drain
off
and
reserve
the
juices,
wrap
the
meat
back
up
in
foil
and
place
it
in
an
oven
which
has
been
warmed
and
turned
OFF.
If
no
oven
is
available
simply
cover
the
foiled
meat
with
a
towel
and
place
in
an
insulated
chest
(an
empty
ice
chest
works
fine).
Allow
to
rest
for
at
least
1 hour.

Smoked Brisket

Grizzlys BBQ


