

Grizzlys BBQ


"When a man's stomach is full
it makes no difference whether he is rich or poor."
Euripides (BC 480 - 406 Greek Tragic Poet)
Steak and Potato
A
rainy
day
didn’t
keep
me
away
from
the
grill.
Found
a
couple
of
beautiful
ribeyes
on
sale
and
I
had
not
had
a
good
basic
“Meat
and
Potato”
meal
in
a
while.
Nothing
fancy,
just
the
ribeyes,
baked
potato
and
green
beans.
The
ribeyes
were
hit
with
salt,
pepper
and
a
little
Montreal
Steak
Seasoning
and
the
green
beans
were
sautéed
with
a
tablespoon
of
bacon
grease
and
a
generous
sprinkling
of
Old
Bay
seasoning
mix.
I
was
in Heaven.
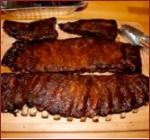
Pork Ribs & Bean Salad
Every
day
that
I
am
alive
and
kicking
is
worth
celebrating.
The
4th
of
July
is
an
especially
important
day
to
celebrate.
Nothing
like
some
slow
Smoked
Pork
Ribs
and
a
cold
summer
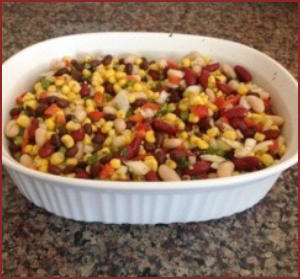
Mexican Bean Salad.
The
Ribs
were
pork
spare
ribs
cut
St.
Louis
style.
The
ribs
and
the
pieces
cut
off
were
all
smoked
at
270F
for
about
2.5
hours,
then
wrapped
with
a
little
brown
sugar
and
apple
juice
and
put
back
on
the
heat
for
another
2
hours.
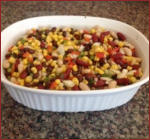
The
Mexican
Bean
Salad
was
made
the
day
before
and
allowed
to
chill
in
the
refrigerator
overnight.
Deep Fried Turkey On a Waring Pro Rotisserie Turkey Fryer
WhoooHooo....it’s
that
time
of
year
again.
Just
got
my
brand
new
turkey
fryer.
Decided
to
do
a
test
cook
with
it
and
make
sure
it lives up to all the hype...before I rely on it for those all important dinners coming up.
This
particular
model
is
the
Waring
Pro
TF200
Rotisserie
Turkey
Fryer
and
Steamer.
(Besides
being
a
Turkey
Fryer,
it
can
also
be
used as a steamer, so you can also have your very own Clam Bake in your backyard this summer).
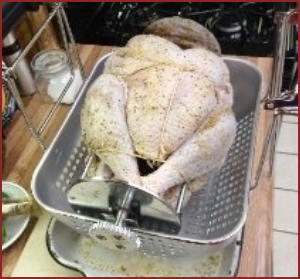
Prepping the Bird
I
started
out
with
a
14.75
Lb.
turkey,
completely
thawed
and
all
“innards”
(neck,
giblets
etc)
removed.
In
the
morning
I
gave
it
a
good
rinsing
and
pat
dry.
Then
seasoned
with
some
Lemon
Pepper
seasoning
I
had
laying
around.
I
then
put
the
bird
back
into
the refrigerator (uncovered) for several hours to dry naturally. This helps dry out the skin some, giving it crispier skin later on.
About
an
hour
before
the
cook,
I
took
the
bird
out
and
allowed
it
to
rest
at
room
temperature.
At
this
time
I
trussed
it
up
nice
and
tight
with
kitchen
string,
tying
the
legs
together
and
then
the
wings.
I
made
sure
the
wing
tips
were
snug
against
the
body.
This
is
a
VERY
important
step.
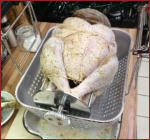
The
bird
is
then
mounted
on
the
rotisserie.
I
thought
mounting
it
on
the
rotisserie
would
be
difficult
for
one
person,
however
it
only
took
me
about
30
seconds.
The
rotisserie
is
then
mounted
on
the
cooking
basket
and
spun
to
make
sure
it
clears
the
basket
on
all
sides.
This
is
where
a
good
trussing
is
very
important.
You
then
allow
the
bird
to
rest at room temperature while you prep the fryer.
Prepping the Fryer
While
the
bird
is
resting
I
filled
the
fryer
with
oil.
You
can
use
several
different
types
of
oil,
although
Peanut
oil
is
preferred
by
most people** (see Tips below for information on choosing the right oil).
What
makes
this
fryer
unique
is
that
the
bird
sits
on
a
Rotisserie
and
is
cooked
in
the
horizontal
position
as
opposed
to
most
fryers
where
the
bird
is
lowered
into
the
hot
oil.
Since
the
food
is
constantly
rotating,
you
only
need
about
2.5
gallons
of
oil
to
cook
it.
Because
of
this
you
don’t
run
the
risk
of
boiling
oil
overflowing
the
cooker
as
your
lowering
the
bird
in
(
a
tremendous
safety advantage).
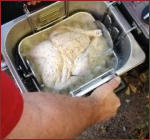
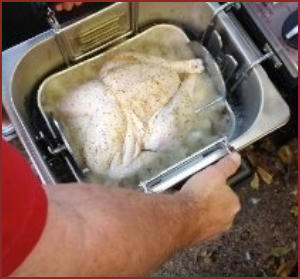
Once
the
oil
has
heated
to
375F,
the
basket
with
the
bird
is
slowly
lowered
into
the
oil.
The
handles
of
the
basket
are
spring
loaded
which
prevent
you
from
accidentally
dropping
the
bird
into
the
oil.
Once
down
all
the
way,
the
gear
on
the
rotisserie
engages
the
motor
gear.
You
simply
flip
the
switch
on
the
panel
and
away
she
goes...spinning
slowly
through
the
hot
oil,
cooking it on all sides.
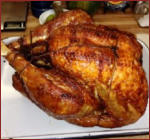
All Done...
It’s
that
easy.
No
mess,
no
overflow,
no
fire
danger.
This
14.75
Lb
bird
took
just
shy
of
60
minutes
to
cook.
And
cook
it
did.
It
came
out
crisp
and
juicy.
I
pulled
her
up,
let
her
rest
above
the
oil
for
a
minute
or
so
to
allow
excess
oil
to
drip
back
into
the
cooker.
Took
the
whole
thing
inside,
removed
the
rotisserie
and
allowed
it
to
cool
for
about
30
minutes.
It
was
absolutely
delicious. I immediately devoured the wings...hey, cooks treat.
Tips
When
choosing
the
right
oil
for
frying
you
need
to
find
one
with
a
high
smoke
point,
such
as
Peanut,
Canola,
Corn,
Sunflower
etc.
As
a
rule,
vegetable-based
oils
have
higher
smoke
points
than
animal-based
fats
like
butter
or
lard.
Although
many
people
use Peanut oil I have found that Canola oil, while less expensive, will do just as well.
Depending
on
what
you
are
frying,
the
oil
will
be
good
for
several
cooks.
The
life
of
your
oil
is
dependent
on
WHAT
you
are
frying
and
how
HOT
you
are
frying
it.
Here
is
a
good
article
on
how
cooking
oils
work
and
how
to
prolong
the
life
of
the
oil
(very good read).
As
I
have
said
time
and
again...If
you
have
never
tried
“Fried
Turkey”,
its
time
to
get
on
the
wagon
and
give
it
a
shot.
You
will
NOT
be
disappointed.
I
have
found
that
I
usually
get
more
“usable”
meat
off
of
a
fried
bird
then
one
that
has
roasted
in
its
own
juices for hours. You don’t get that “mushy” meat that you come across on the bottom of the bird.
Now
this
doesn’t
mean
to
give
up
your
traditional
method
of
cooking
turkey,
whether
it
be
in
a
roaster,
roasting
bag
or
smoking. It just allows you to have another “tool in the arsenal”. Try it once and I think you’ll be convinced.


My Blog
Grizzlys BBQ


"When a man's stomach is full
it makes no difference whether he is rich or poor."
Euripides (BC 480 - 406 Greek Tragic Poet)
Grizzlys BBQ


My Blog
Steak and Potato
A
rainy
day
didn’t
keep
me
away
from
the
grill.
Found
a
couple
of
beautiful
ribeyes
on
sale
and
I
had
not
had
a
good
basic
“Meat
and
Potato”
meal
in
a
while.
Nothing
fancy,
just
the
ribeyes,
baked
potato
and
green
beans.
The
ribeyes
were
hit
with
salt,
pepper
and
a
little
Montreal
Steak
Seasoning
and
the
green
beans
were
sautéed
with
a
tablespoon
of
bacon
grease
and
a
generous
sprinkling
of
Old
Bay
seasoning
mix.
I
was in Heaven.
Pork Ribs & Bean Salad
Every
day
that
I
am
alive
and
kicking
is
worth
celebrating.
The
4th
of
July
is
an
especially
important
day
to
celebrate.
Nothing
like
some
slow
Smoked
Pork
Ribs
and
a
cold
summer
Mexican Bean Salad.
The
Ribs
were
pork
spare
ribs
cut
St.
Louis
style.
The
ribs
and
the
pieces
cut
off
were
all
smoked
at
270F
for
about
2.5
hours,
then
wrapped
with
a
little
brown
sugar
and
apple
juice
and
put
back
on
the
heat
for
another
2
hours.
The
Mexican
Bean
Salad
was
made
the
day
before
and
allowed
to
chill
in
the refrigerator overnight.
Deep Fried Turkey
Waring Pro Rotisserie Turkey Fryer
WhoooHooo....it’s
that
time
of
year
again.
Just
got
my
brand
new
turkey
fryer.
Decided
to
do
a
test
cook
with
it
and
make
sure
it
lives
up
to
all
the
hype...before
I
rely
on
it
for
those
all
important
dinners coming up.
This
particular
model
is
the
Waring
Pro
TF200
Rotisserie
Turkey
Fryer
and
Steamer.
(Besides
being
a
Turkey
Fryer,
it
can
also
be
used
as
a
steamer,
so
you
can
also
have
your
very
own
Clam
Bake
in
your
backyard
this
summer).
Prepping the Bird
I
started
out
with
a
14.75
Lb.
turkey,
completely
thawed
and
all
“innards”
(neck,
giblets
etc)
removed.
In
the
morning
I
gave
it
a
good
rinsing
and
pat
dry.
Then
seasoned
with
some
Lemon
Pepper
seasoning
I
had
laying
around.
I
then
put
the
bird
back
into
the
refrigerator
(uncovered)
for
several
hours
to
dry
naturally.
This
helps
dry
out
the
skin
some,
giving
it
crispier skin later on.
About
an
hour
before
the
cook,
I
took
the
bird
out
and
allowed
it
to
rest
at
room
temperature.
At
this
time
I
trussed
it
up
nice
and
tight
with
kitchen
string,
tying
the
legs
together
and
then
the
wings.
I
made
sure
the
wing
tips
were
snug
against
the
body.
This
is
a
VERY
important
step.
The
bird
is
then
mounted
on
the
rotisserie.
I
thought
mounting
it
on
the
rotisserie
would
be
difficult
for
one
person,
however
it
only
took
me
about
30
seconds.
The
rotisserie
is
then
mounted
on
the
cooking
basket
and
spun
to
make
sure
it
clears
the
basket
on
all
sides.
This
is
where
a
good
trussing
is
very
important.
You
then
allow
the
bird
to
rest
at
room
temperature while you prep the fryer.
Prepping the Fryer
While
the
bird
is
resting
I
filled
the
fryer
with
oil.
You
can
use
several
different
types
of
oil,
although
Peanut
oil
is
preferred
by
most
people**
(see
Tips
below
for
information on choosing the right oil).
What
makes
this
fryer
unique
is
that
the
bird
sits
on
a
Rotisserie
and
is
cooked
in
the
horizontal
position
as
opposed
to
most
fryers
where
the
bird
is
lowered
into
the
hot
oil.
Since
the
food
is
constantly
rotating,
you
only
need
about
2.5
gallons
of
oil
to
cook
it.
Because
of
this
you
don’t
run
the
risk
of
boiling
oil
overflowing
the
cooker
as
your
lowering
the
bird
in
(
a
tremendous
safety advantage).
Once
the
oil
has
heated
to
375F,
the
basket
with
the
bird
is
slowly
lowered
into
the
oil.
The
handles
of
the
basket
are
spring
loaded
which
prevent
you
from
accidentally
dropping
the
bird
into
the
oil.
Once
down
all
the
way,
the
gear
on
the
rotisserie
engages
the
motor
gear.
You
simply
flip
the
switch
on
the
panel
and
away
she
goes...spinning
slowly
through
the
hot
oil, cooking it on all sides.
All Done...
It’s
that
easy.
No
mess,
no
overflow,
no
fire
danger.
This
14.75
Lb
bird
took
just
shy
of
60
minutes
to
cook.
And
cook
it
did.
It
came
out
crisp
and
juicy.
I
pulled
her
up,
let
her
rest
above
the
oil
for
a
minute
or
so
to
allow
excess
oil
to
drip
back
into
the
cooker.
Took
the
whole
thing
inside,
removed
the
rotisserie
and
allowed
it
to
cool
for
about
30
minutes.
It
was
absolutely
delicious.
I
immediately
devoured
the
wings...hey, cooks treat.
Tips
When
choosing
the
right
oil
for
frying
you
need
to
find
one
with
a
high
smoke
point,
such
as
Peanut,
Canola,
Corn,
Sunflower
etc.
As
a
rule,
vegetable-based
oils
have
higher
smoke
points
than
animal-based
fats
like
butter
or
lard.
Although
many
people
use
Peanut
oil
I
have
found
that
Canola
oil,
while
less
expensive,
will
do just as well.
Depending
on
what
you
are
frying,
the
oil
will
be
good
for
several
cooks.
The
life
of
your
oil
is
dependent
on
WHAT
you
are
frying
and
how
HOT
you
are
frying
it.
Here
is
a
good
article
on
how
cooking
oils
work
and
how
to
prolong
the
life
of
the
oil (very good read).
As
I
have
said
time
and
again...If
you
have
never
tried
“Fried
Turkey”,
its
time
to
get
on
the
wagon
and
give
it
a
shot.
You
will
NOT
be
disappointed.
I
have
found
that
I
usually
get
more
“usable”
meat
off
of
a
fried
bird
then
one
that
has
roasted
in
its
own
juices
for
hours.
You
don’t
get
that
“mushy”
meat
that
you
come
across on the bottom of the bird.
Now
this
doesn’t
mean
to
give
up
your
traditional
method
of
cooking
turkey,
whether
it
be
in
a
roaster,
roasting
bag
or
smoking.
It
just
allows
you
to
have
another
“tool
in
the
arsenal”.
Try
it
once
and
I
think
you’ll be convinced.

Grizzlys BBQ